
HOW TO MAKE WAX SEAL STICKERS
Creating pre-made wax seals is a fun way to save time and minimise waste. If you're stamping your own wedding wax seals, or want to have a stash of wax seals to hand, making them ahead of time will ensure that no paper or envelopes go to waste. You don't have to worry about mishaps or getting the right orientation the first time around. This method takes the pressure off, while keeping all the fun!
You can simply stamp directly onto a silicone mat, and once your wax seals have dried, you can peel them off and add backing stickers for easy application. We love this method because it's swift, convenient and satisfying. Any waste wax can then be put aside and re-used with a wax melting spoon, or you can return your wax waste to us for free wax sticks as part of our recycling programme.

What you’ll need:
- A glue gun on low-heat setting
- Wax sticks that fit your glue gun (7mm size for European and British glue guns and 11mm for US)
- An Heirloom Ice Pack (or a regular ice pack)
- A muslin cloth or regular towel
- A silicone mat
- Your bespoke Heirloom wax stamp
- Adhesive backing stickers to match your wax seal size
- Optional: a jar lid to catch wax drips from your glue gun
Getting yourself set up:
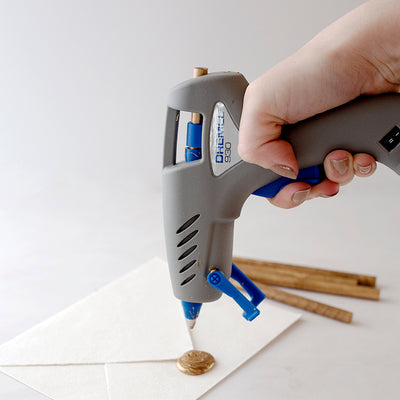
- Insert your wax stick into your glue gun, plug it in and set it to the lowest temperature.
- Have more wax sticks nearby so you can keep feeding them into your glue gun as you need them.
- Grab your ice, towel, and maybe a cup of your favourite tea or coffee for ultimate comfort.
- Place your stamp directly onto the ice, brass facing down so that it doesn't overheat.
- Place a jar lid underneath your glue gun nozzle while it heats up and to catch any wax that drips. These can be re-melted using a wax spoon to avoid waste.

Step One

Step Two
Take your wax stamp off the ice and dab it on your towel to remove any moisture as droplets will show up on your stamped impression. Press your stamp quickly and firmly into the centre of the wax. There is no need to rest it in the wax - as your wax stamp is cool from the ice it can be removed easily without sticking to the wax. Wax stamping takes a bit of practice. Don't worry if you don't instantly achieve your desired wax seals. Stamp a few practice seals to get the hang of it. The great thing about wax is that it can be re-melted as many times as you like!

Step Three
Repeat steps one and two to fill your mat.


Step Four
Once your wax seals are dry and cooled, you can peel them carefully off the mat. Don't forget to switch your gun off once you have finished! 
Step Five
Next up is applying backing stickers. Peel your backing stickers from the sheet onto the back of your wax seals.


Step Six
And finally, the best part! To stick the seal to a surface, peel off the back of the sticker and apply. Congratulations, you've made your own wax seal stickers!


The great thing about using a glue gun with your bespoke wax stamp is that you can quickly create numerous wax seals at once. This makes it the perfect stamping option for weddings or events. It's also lovely to have a few wax seal stickers tucked away for those moments you get caught for time writing occasion cards. Just use a wax seal sticker and you'll instantly add a personalised and charming touch to your paper.
For more tips, trick and tutorials on how to use your Heirloom stamps see here. If there's anything in particular you'd like us to cover in our next tutorial, please let us know - we love hearing from you!